
Hiya!
Today I wanted to show a little bit of face contouring. I'm going to be using alot of product to show the full effects on camera, it looks great for a night out face, but for daytime just tone it down and use less!
Most people know what face contouring is, for those who don't, its a way of using makeup to slim, define or accentuate areas of the face, and highlight other areas to give your face more dimension
To put it simply, think of the areas of your face that light will naturally hit, those should be highlighted, areas that light wouldn't naturally shine on, should be contoured.

Here's a very attractive picture of me trying to show you the basics, I look so serious! Haha x
So, I'll show you guys a little contouring using a nice and cheap kit, then mabye later we'll advance it and get more professional and complex! Exciting!


I'm using good old Sleek Makeup with their face contour kit, costing £6.49 its pretty cheap, lasts ages, and it comes in Light, Medium and Dark so theres one for most skin types.
If you wanna use things you already have lying about, highlighters examples are Mac in Shell or Benefit HighBeam - anything like that
For the contouring, you need a powder a few shades darker than your skin, making sure it is a matte (no shine) - Benefit Hoola Powder works great!
For actual brushes, I'm keeping this really simple, using a basic blusher brush, eyeshadow blending brush and shader brushes, as I always say, whatever works for you!
So, let's begin!
To start off, apply your usual foundation, concealer, whatever you do to create your "base"
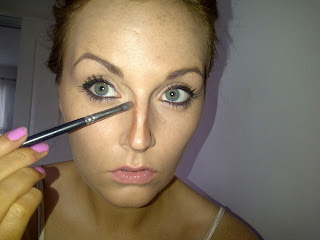
I'm starting off with my nose, using a shader brush, I applied lightly down both sides of my nose, and the tip slightly

When your blending it in, always blend in the same direction you applied it, so it doesn't spread the colour everywhere you dont want it to be!

For the cheeks, your wanting to contour below the hollow of your cheekbone, if it helps, hold a brush to your face, lining it up with the top of your ear to your lips, then apply underneath, this also helps you get it even on both sides of your face

Follow up to your temples, and slightly along your forehead

Don't forget a little bit on your jawline, and remember your neck too! Sometimes its nice to apply to your collarbones too, just to make them stand out a little more

I cant say this enough - BLEND BLEND BLEND! I used an old foundation brush to really buff into my skin, you don't want ANY harsh lines on your face

I just used my fingers to apply the powder highlighter.....

And if your using a liquid highlighter, just dab slightly with your middle finger, have a peak at the picture at the top for basic highlight areas.
Obviously, you'll know your own face, some people have lovely dewy skin and wont require much highlight, others might want a more dramatic look for a photo shoot or nighttime look, I've used alot to show up better in pictures for you guys, time for some befores and afters!


This was taken in natural light....

See how slimmer the nose looks, and the cheekbones look more prominent
Remember to think about your lighting when your contouring, in a dimly lit room you could go overboard!

Sorry Nicki if thats the look you wanted, but not my idea of contouring!
What do you think? Dramatic yes, but you could also do it really subtle, just a touch would look fab!
The sleek kit isn't bad, a little hard to blend, but for the price, you cant complain! Practise makes perfect with contouring, keep experimenting - I'm still learning, but that's my attempts so far!
Let me know if you try it out!
Gem x

